KAMEN RIDER 1 - 1/12 SCALE HANDMADE ACTION FIGURE


ライダーキック!
Despite not growing up in Japan, Hawaii, or California, I LOVE Tokusatsu shows. That passion probably stems from being part of that age group that brought Anime (and other Japanese pop culture artifacts) into mainstream American consumerism. I was constantly watching these shows, completely unaware of their origin - starting with the constant broadcasting of Godzilla (also Tokusatsu) on numerous Saturday morning sci-fi movie blocks, to the birth of Power Rangers in America (known as Super Sentai in Japan, and also Tokusatsu), to the localization and explosion of Pokémon as THE after-school cartoon (not Tokusatsu, but still relevant). There were no cultural boundaries when I watched these shows - they just existed. And they were fucking awesome!
I’m not going to give you a whole history lesson on how these shows came to be, or how they influenced American culture - you just need to know that I was in my twenties when I watched my first episode of Kamen Rider (1971-1973), and that I didn’t live in the Japan nor was it the 1970s. But I love Kamen Rider!
Takeshi Hongo is a grasshopper-themed cyborg who fights against the evil, fascist-themed organization, Shocker. Originally a motorcycle racing biologist with a 600 level IQ, Hongo was captured by Shocker to be turned into a cyborg so he could lead Shocker’s army to world-domination - however, he escapes before they can implement their mind control over him. For eight episodes, Takeshi Hongo fights against Shocker until a motorcycle accident causes the actor to go on leave. For 30-ish episodes, Kamen Rider 2 (Hayato Ichimonji) fights against Shocker in his absence (with a very similar origin story). Eventually, Takeshi Hongo comes back to join up with Hayato and they become known as Kamen Riders 1 and 2 respectively.
Yes, it follows the “monster-of-the-week” structure that we all know from Power Rangers, but this is a whole different level! There are continuing stories that run throughout the series, there’s crazy psychedelic effects, there’s blood and gore - I mean, this was before the template was established! It’s ULTRA low-budget! Seriously, just watch the show!

Kamen Rider 1 taking on Shocker soldiers! This show fucking rocks!
プロセス
This figure came together a lot quicker than Batman 1939. My skills were getting better, but I also wanted to work a lot faster and try to create something in a faster time-frame.
I decided to make this figure the week I bought the old SH Figuarts Kamen Rider figure - my thought was “this is okay, but I think I can make this better.” So I just stripped off the parts that I wanted to use, slapped them on a 3A body with an outfit, and called it a day. I mean, I wish it were that easy but it actually took a lot more work than that - the SH Figuarts figure was essentially a “blank” that they could recolor over and over for all of the different versions of Kamen Rider that exist (the costume went through so many changes - sometimes alterations were made within the same episode), so I would have to add certain details that would make it closer to accurate. I also wanted to do a better paint job and just make the figure look more “premium” in general.
The actual first thing I did was take off Kamen Rider’s head, stripped the paint with Isopropyl Alcohol (I’m shocked that it worked, but SH Figuarts figures apparently use pretty weak paint), and snipped off his plastic antennae - they looked like crap, and I wanted metal ones. I rigged up an electroetching system using an old charger and a saltwater bath (I’ll need to write in more detail about this at some point - kids, don’t try this at home), masked off sections of metal wire with nail polish, and used the electroetching setup to recreate the segments in his antennae (I’m almost positive the original helmet used TV antennae). I actually had to do this process in several steps, but the results were definitely worth it! I masked off the eyes, primed and painted the head, then glued the new metal antennae in. I also did a tiny bit of weathering, but I honestly feel that I could’ve gone further with it.

Posing the figure shortly after I made it.

Creating the scenery for the main photo.
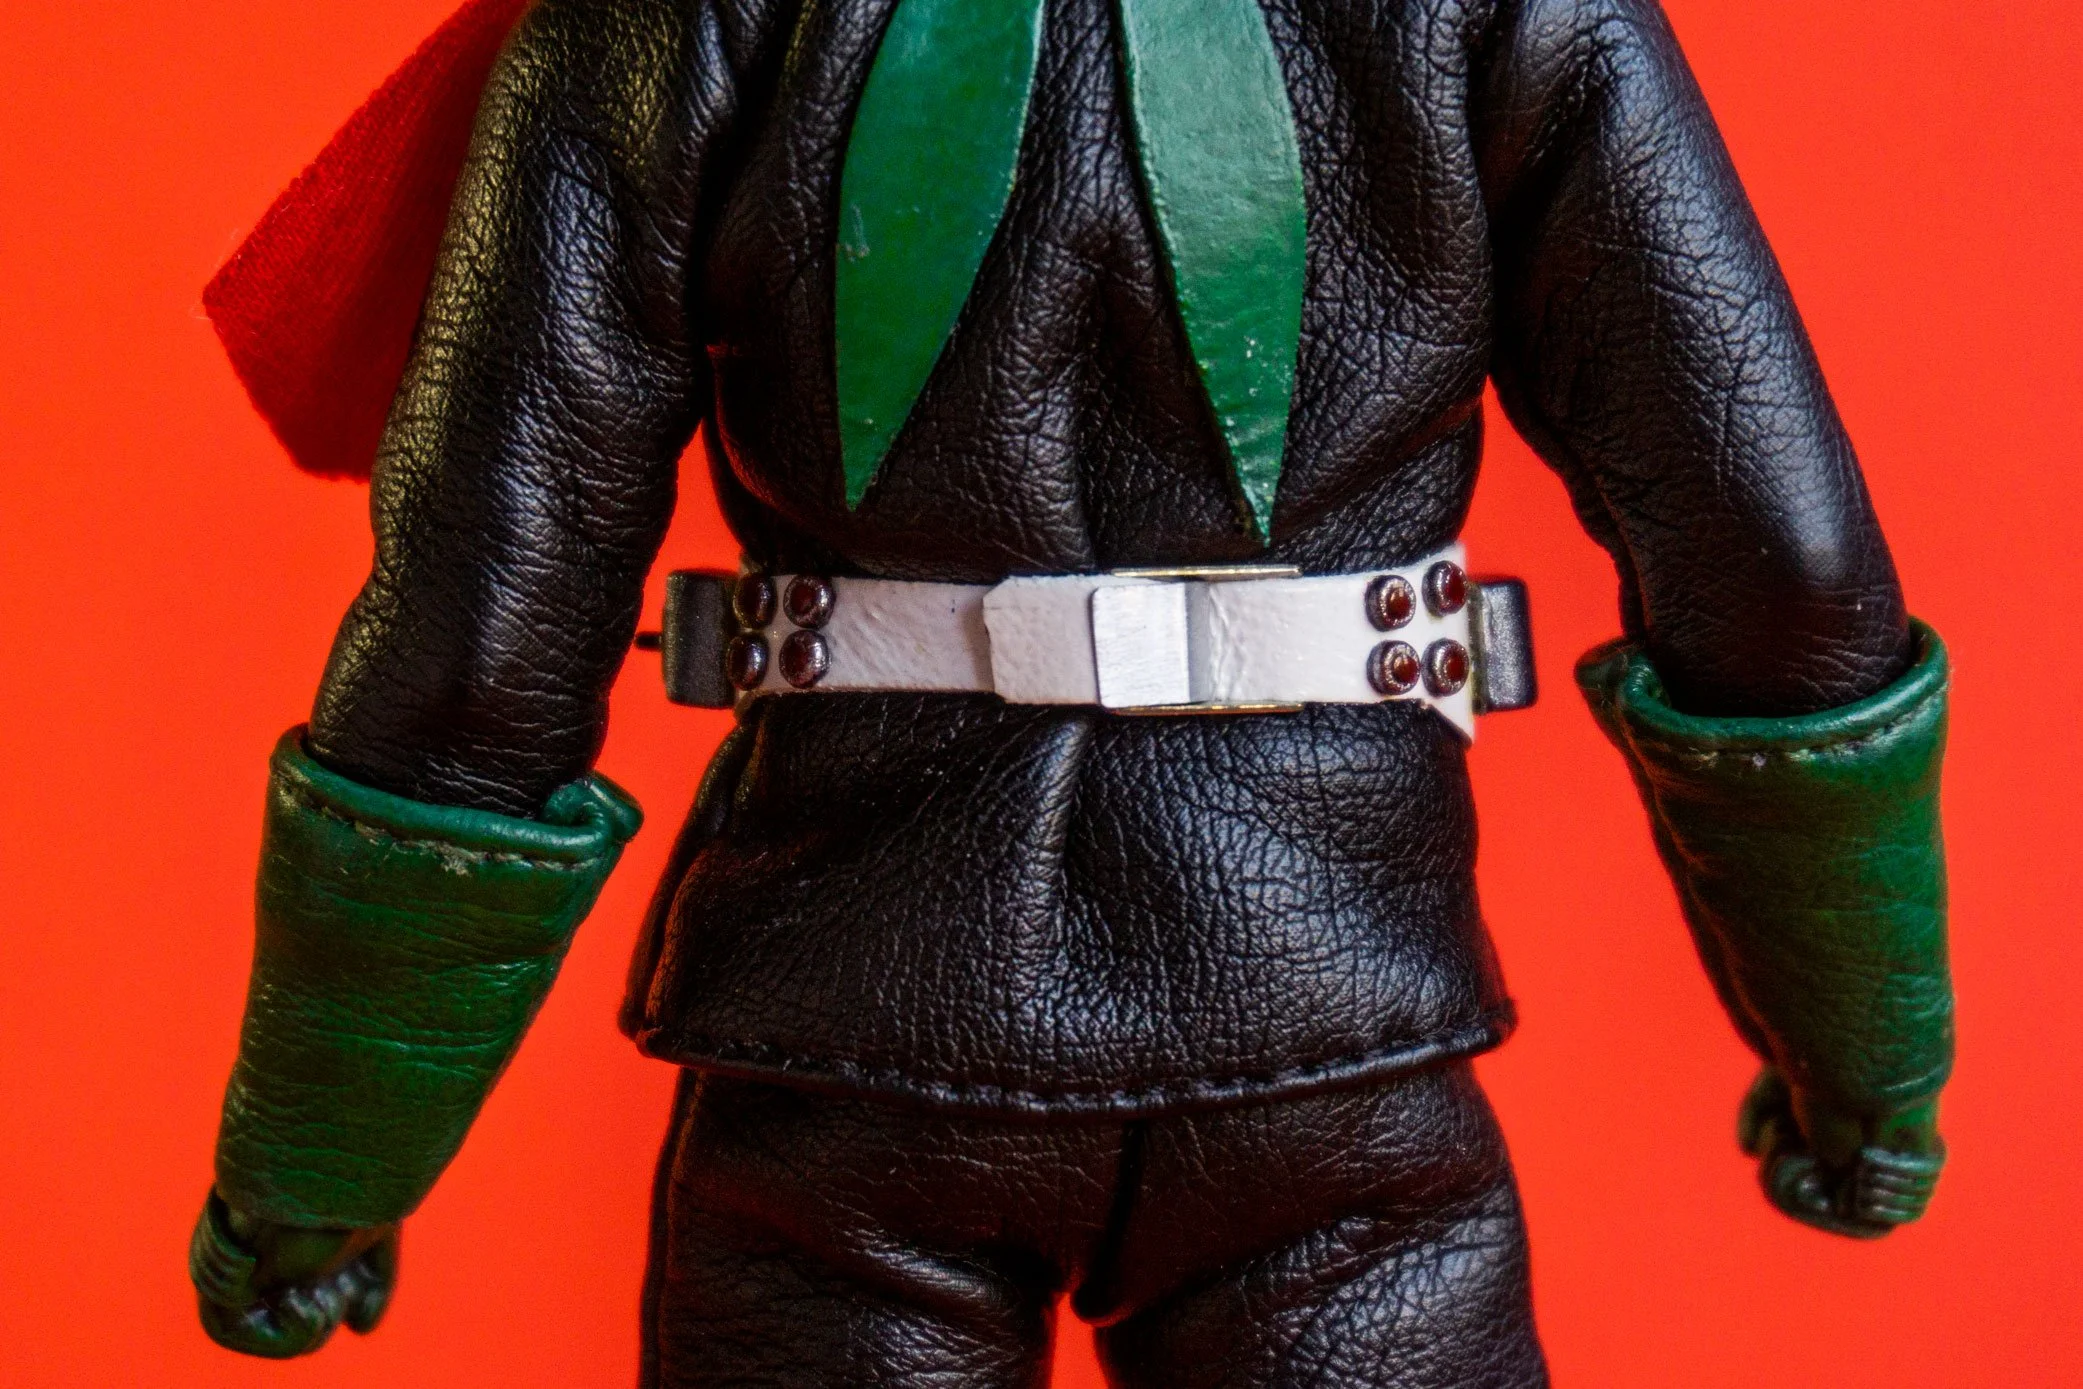
The other parts were much easier - I glued strips of wire across the hands to mimic the piping on the gloves since the original hands didn’t have that unlikely Tokusatsu/Sentai costume element. I then primed and painted the hands with the main cyclone belt part and the two silver bobs on each side - the silver used by most toy companies looks like glitter paint. Those were the last parts that were “borrowed” from the figure.
The belt still wasn’t done though! I cut the main shape of the belt from a piece of white leather that I had that, unfortunately, needed to be painted a bright white since it looked more like a dingy grey. I then made the back buckle out of a photo etch buckle and a piece of aluminum from a soda can - it took a few tries to get the right bends, but it actually looks pretty accurate from what I’ve seen. For the little “jewels” I had to delicately sculpt them from scratch, casted them in epoxy (you can see the method I used in my tutorial here), painted them, then glued them onto the belt. Then I had to make the fan part of the cyclone part - you know, the part that’s barely even visible even though I painted it bright red? Yeah, I had to delicately cut and glue styrene bits together to make it, messing up several times along the way. Anyways, everything was glued to the belt using Barge cement.
The outfight was made out of this amazing faux leather that I found - it was actually part of some Forever 21 short-shorts that I embarrassingly bought from Goodwill to use for this project. I swear I only wore the shorts out once! Anyways, it’s amazing material and took paint really well - I actually painted it green for the gauntlets and the boots. By the way, the boots are actual tiny boots - I sculpted feet out of Magic Sculpt and glued the sewn boot pattern onto the feet, tucked and glued the remaining faux leather underneath the feet, then glued on the soles that I made out of styrene. Okay, so the feet are permanently attached to the boots, but the figure has actual tiny boots! The last real challenge was making that carapace chest armor part!

Practice photo that I took without the background - notice my TV in the background
The chest armor is clearly foam latex in the show, and also changes quite a bit - usually going from smooth to rough as the show progresses. In the later part of the show, it looks like they replace it with a sewn version that probably still has the molded foam latex parts inside. I decided that craft foam would probably do the trick, so I cut out the shapes, dremeled them to round them off, then painted them green. I then glued the pieces with Barge cement on each side of the zipper...
I forgot to tell you about the zipper!! The zipper wasn’t actually that hard at all - it’s a size 0 zipper from Tiny Frock Shop or Etsy Store Here. Both places sell the same zipper, and I just glued it the outfit and reinforced it with stitching. It was really easy, but it adds so much to the figure! It actually works too!
As always, Golden Fluid Acrylics were my paint of choice when it came to painting. I actually did most of the painting with an airbrush, and reserved brush painting for some weathering and details. I really like how the green came out - the green on the late type version of the costume is actually supposed to be a little darker and duller, but I kind of wanted to brighten it up a bit.
最後
I’m overall pretty happy with how the figure turned out - I definitely think it looks miles above the original SH Figuarts figure, that’s for sure - however, I’m definitely not 100% about it. I’m not really about the parts that come from the original figure - not because I’m reusing the parts, but because the parts aren’t really that accurate to the look of Kamen Rider. All of the parts are too small because SH Figuarts figures are tiny! I also think that the helmet looks too “perfect”. Also, while I really love the faux leather that I found, it’s just a little too thick and contributes to the bulkiness of the outfit. Speaking of which, this was put together when I was still fairly ignorant of sewing techniques so the pattern leaves a lot of extra material which just adds to the bulkiness.