BATMAN YEAR 100 - 1/12 SCALE HANDMADE ACTION FIGURE


Intro
Remember how I mentioned in my write-up of my first Batman figure that I always wanted a 1939-styled version of Batman in figure form? Well, I’ve wanted a figure of Paul Pope’s take on Batman longer! Paul Pope’s Batman Year 100 is probably one of my favorite versions of Batman - gritty, resourceful, and mysterious. I’m not even going to bother giving you a synopsis, because you should just read it.
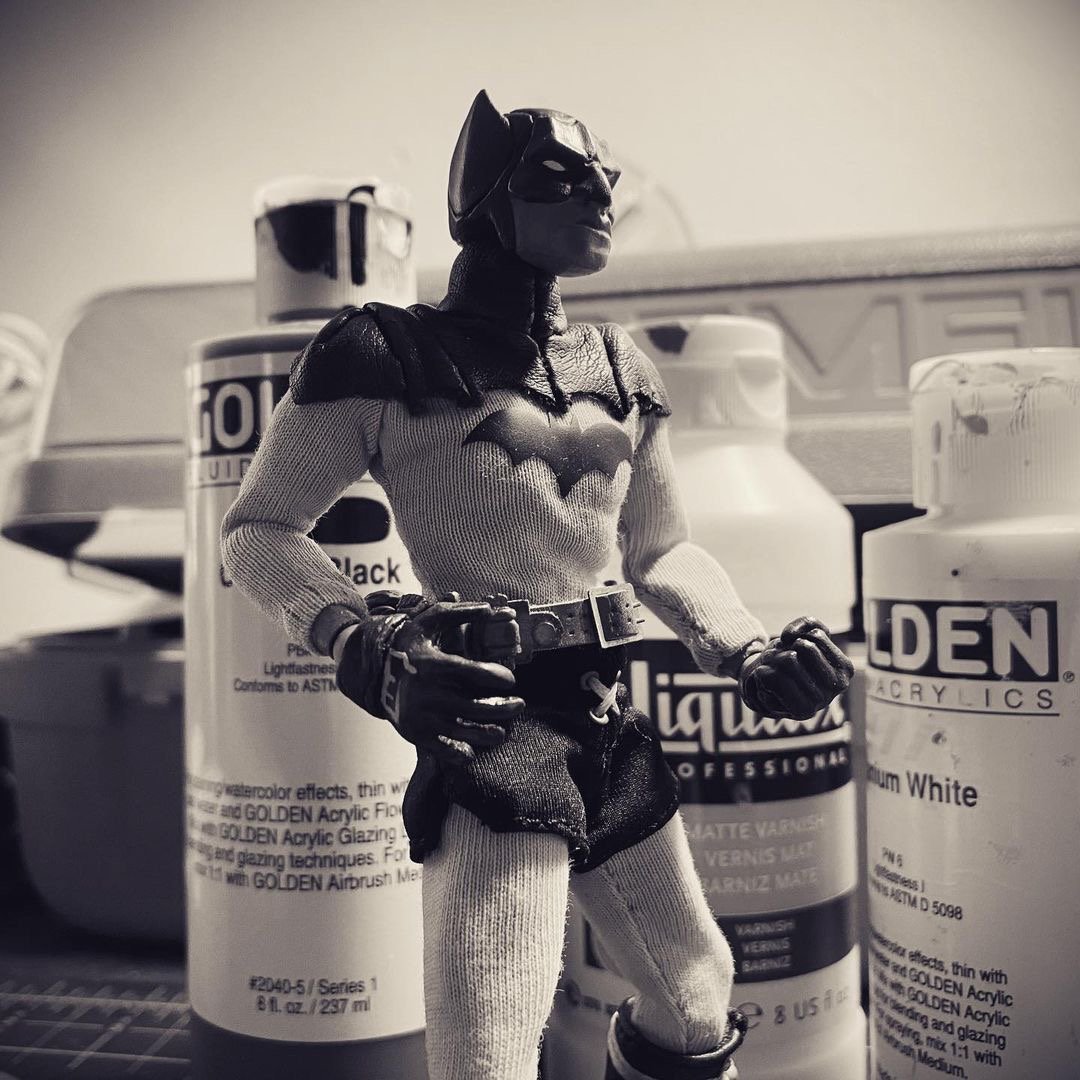
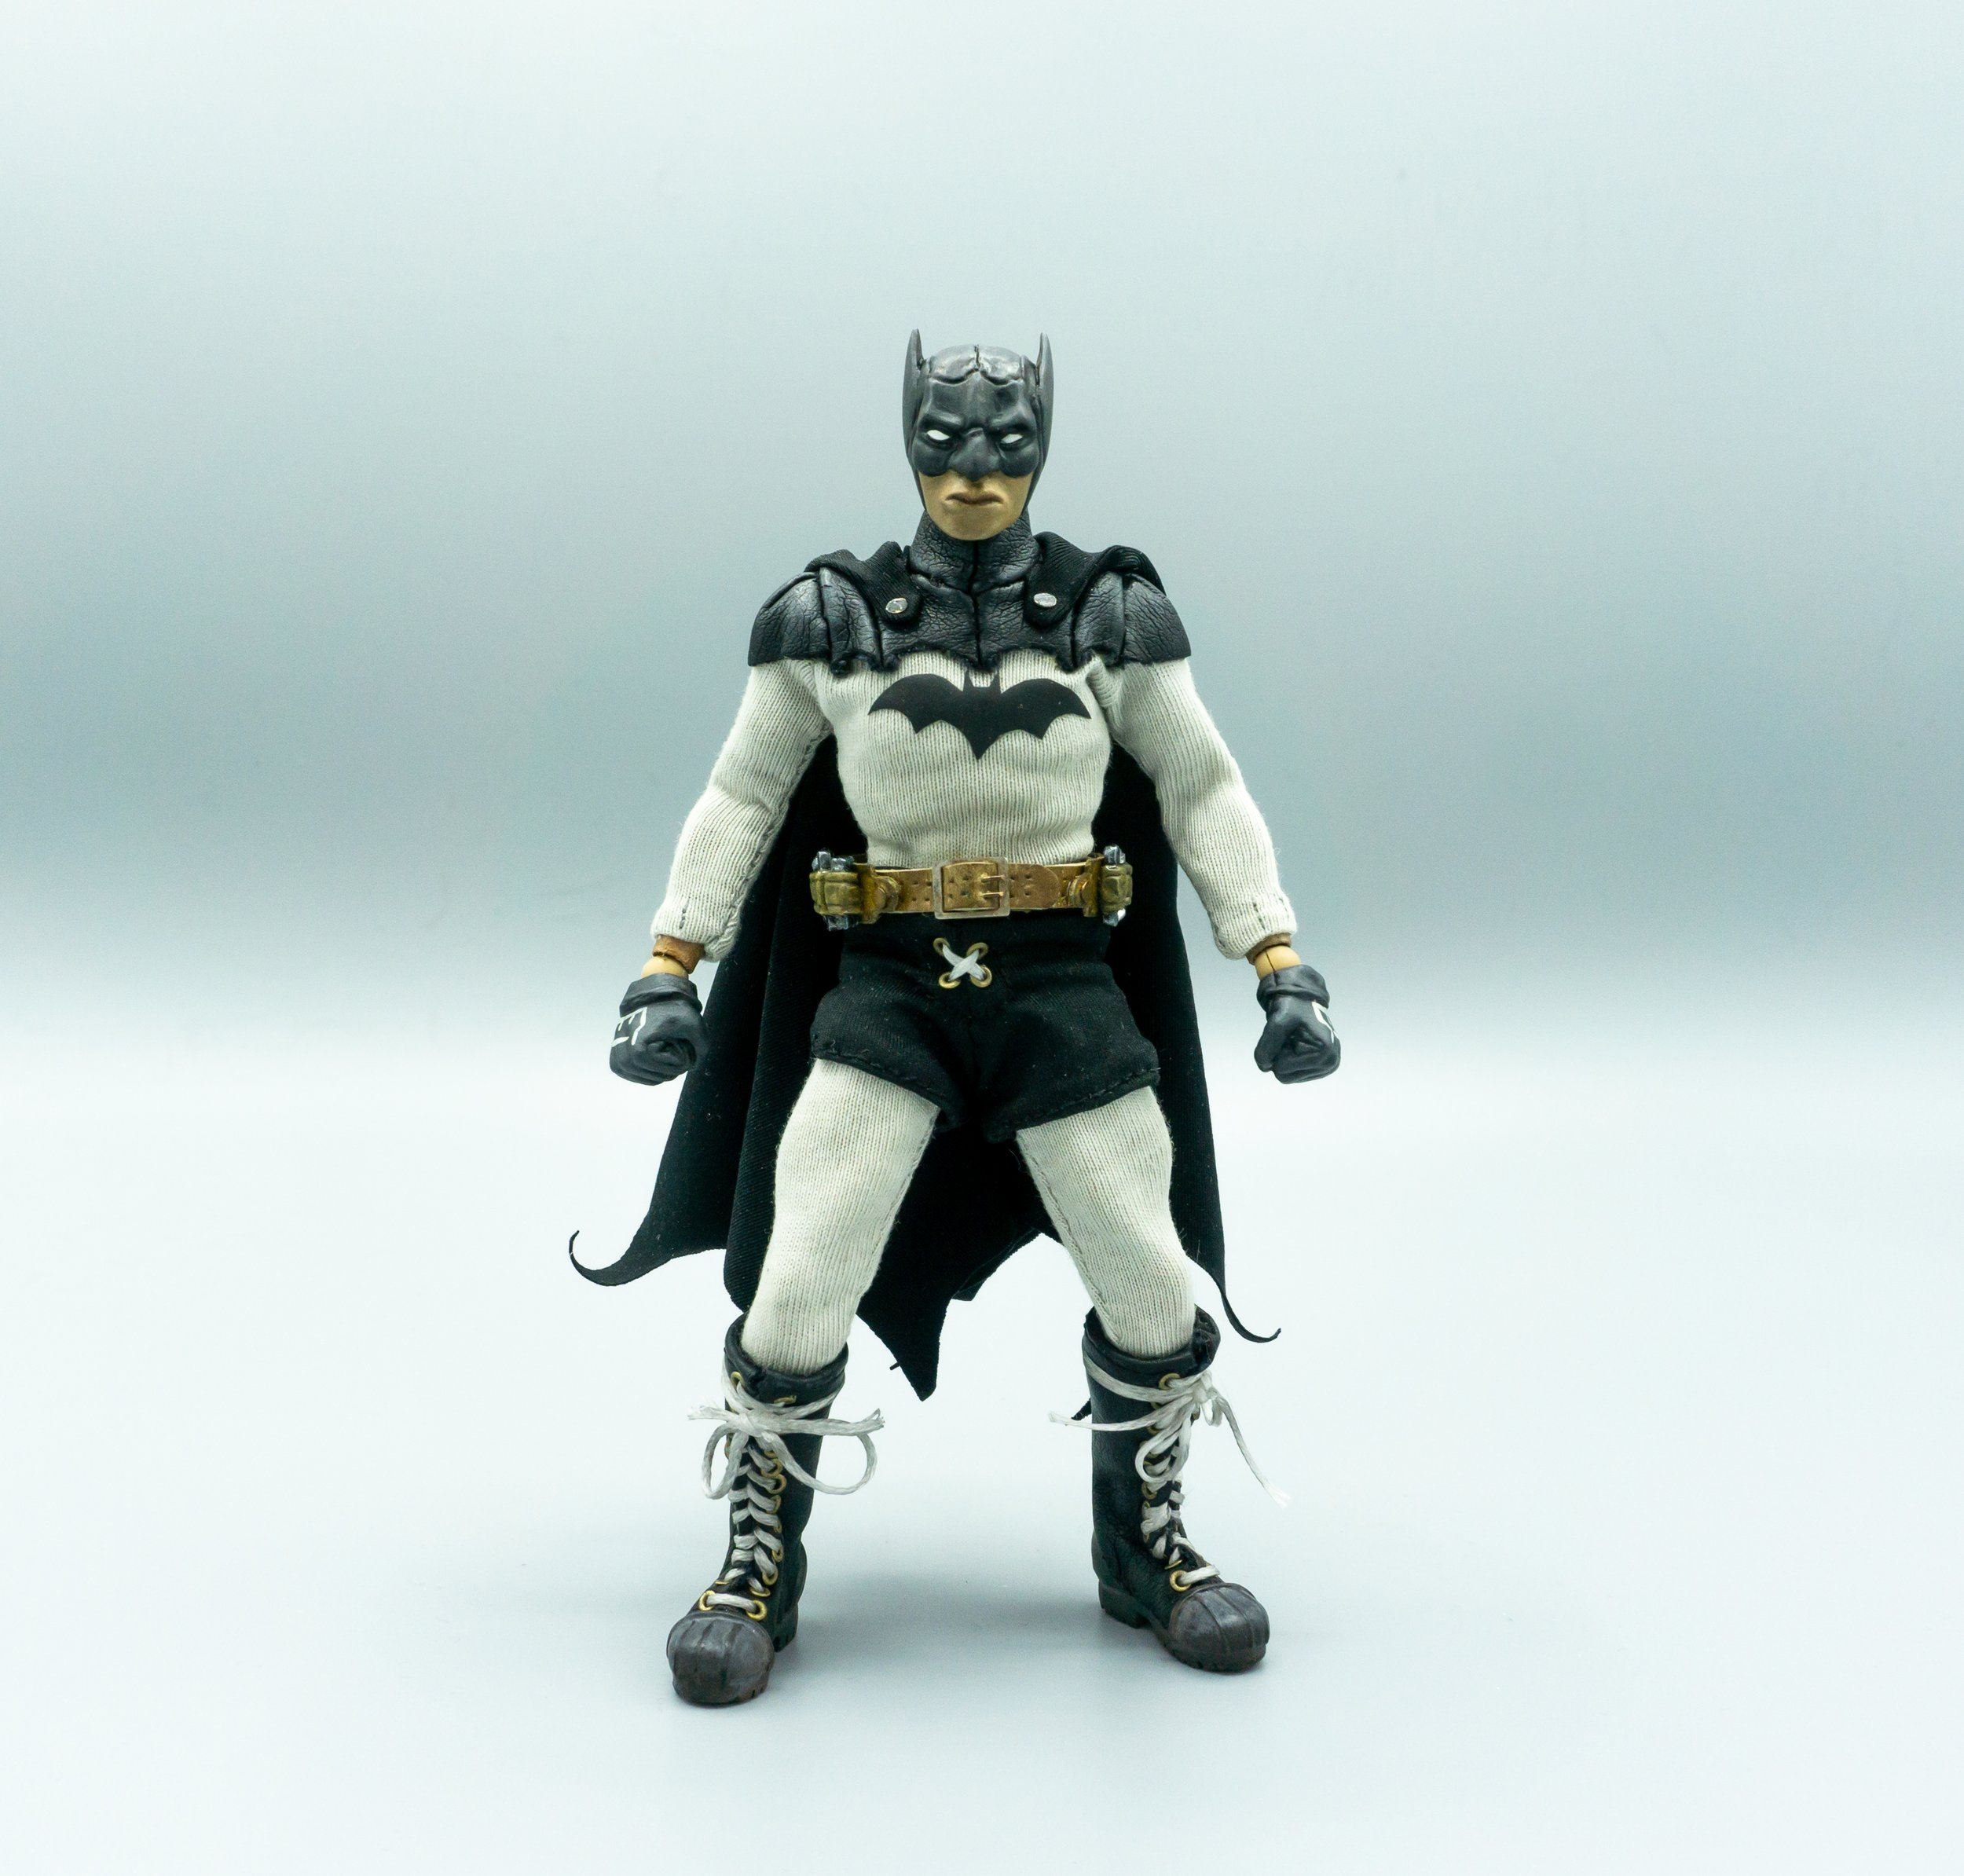
Back when I first read Batman Year 100, I had just figured out how to actually sculpt - up until that point, all of my attempts were pretty underwhelming. It took me several years to realize that people had brow ridges, and that revelation explained why every head sculpt I had done before that point looked so freakin’ alien-like. Looking at the exaggerated features of Paul Pope’s Batman (and how he was off-model in almost every panel) made me feel somewhat confident that I could probably pull off a head sculpt of the guy. I consider the sculpt to be my first serious sculpt, and I was pretty happy with the results.
Then after that, nothing. Sure, I tried to put some of the other parts together, but my skill really didn’t match what I wanted to do with it and I let myself feel self-conscious about it. I put away the sculpt and let it sit in storage with a bunch of other half-finished projects for about 12 years. The sculpt followed me from a move in Arizona, to me moving to LA, to moving in with my girlfriend (who became my wife), to our new apartment. It wasn’t until after making the Kamen Rider figure that I realized that I still had the head sculpt! After having two figures down, I knew I could finally do this one justice.
Process

Bottom: original sculpt from 2008. Top: resculpt from 2020.
After 12-ish years, I can look at this head sculpt and still be really proud of it - but I still see its flaws. The head was too small at the crown, the jaw was to long and large, the lips were a little too big, etc. The first step I took was to fix the sculpt and make it look closer to Paul Pope’s artwork. I used the same brand of epoxy putty - Magic Sculpt - for my reworked head sculpt.
After getting the head done, I jumped right into sculpting the hands. I started with a wire armature, and sculpted multiple sets of hands with Magic Sculpt. There’s really nothing special about it. I also sculpted the belt pouches and tools from Magic Sculpt. Once all of the parts were finished, I made molds of them with Mold Star 16 and casted the pieces using Smooth Cast 300. After having those parts ready, I realized that the 3A body that I like to use looked a little scrawny compared to Paul Pope’s art, so I used more Magic Sculpt to bulk it up a bit.
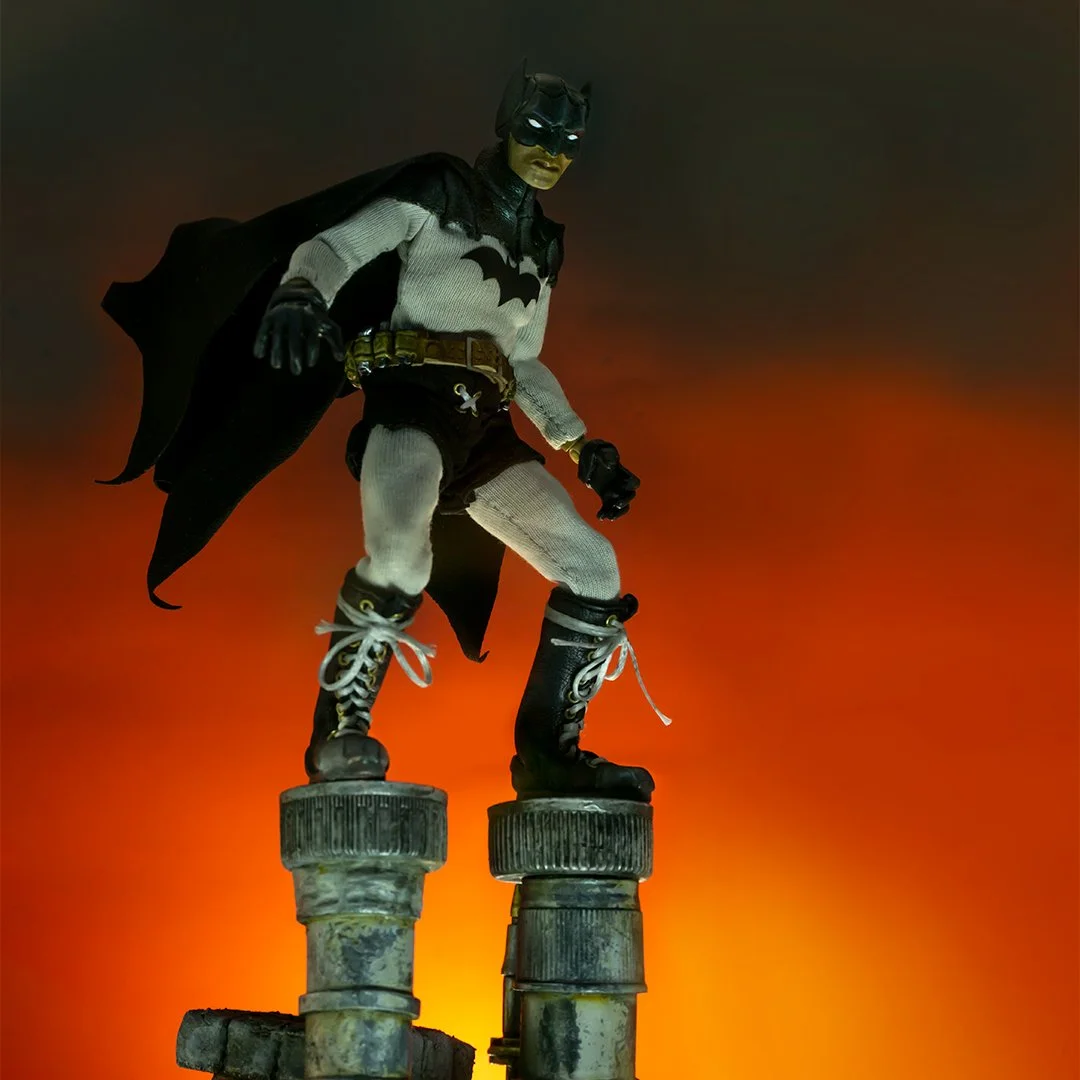
Making the boots proved to be the most challenging part of the whole figure - I wanted the boots to look real, so I had to figure out how to do the laces, eyelets, and rubber heels and toes while employing a similar method that I used to make the boots of my Kamen Rider figure. I started by making the soles from strips of styrene sheet and plastic cement. Once the basic shape of the soles were good, I took a tiny Olfa hobby saw and made the boot sole ridges, then bent the plastic soles into the shape of actual boot soles (there’s a slight curve at the toe of nearly all boots). One the soles were done, I sculpted the feet with the heels and toes - my idea was to cover the “foot” with the sewn and laced boot made from faux leather, glue it all together, then cut off the excess faux leather right at the edges of the sole, toe, and heel. This actually worked much better than I expected it would, and I think the results are almost perfect!
But I really can’t skip over the really difficult part of the boots - gluing those freakin’ eyelets in! I actually found these weird dollhouse electrical plug eyelets that looked about the right scale, so I ordered a bunch of them. I had to cut the ends off of each one, make a hole in the faux leather, then glue each eyelet in place. I have zero desire to do that again.

Figuring out the pattern for the faux leather part of the boots.

The nearly finished boot after it’s been cut, sewn, laced, and glued in place.
The sewing process was thankfully a lot more straight forward! By this point, I learned a little more about sewing and making patterns so the outfit is sewn together using a running back stitch with a much better pattern than my previous Batman figure. The grey body suit is actually made from cotton blend t-shirt material dyed a very light grey. The belt was made in a similar way as the belt on my previous Batman figure, just with more detail and a realistic brass buckle (I can’t believe that I’m still using the leather from that old wallet). Sewing the shoulder covering was a little more tedious, mainly because all of the faux leather pieces were super tiny and I had to stitch them together using my big dumb hands. I think I pulled it off though!
The painting process didn’t present too many challenges - I’m really getting into the zone with painting, and it’s easily my favorite part of the process! I wanted to try and improve on creating more realistic skin tones and creating a weathered look to the leather. I may have gone a little overboard on the leather dry brushing, but I wanted to imitate the texture that Paul Pope had illustrated.
I should also talk about the base! Obviously, I’m all about creating “environments” for when I do my photos of the figures, and for Batman Year 100 I wanted to somewhat recreate the cover to the TPB, but in a way that showed off the detail of the figure. The base was made almost entirely out of random bits and pieces - highlighter tubes, pen caps, soda bottle lids, etc. I used the highlighter tubes to create the giant exhaust pipes and heated them over my stove to bend them. The brick chimney is made out of pink insulation foam from the hardware store - it was my first time creating a miniature brick façade and, while I think it looks okay for the photos, I’m definitely going to redo it in the future. I think it looks pretty convincing for the photos.

The base before and after assembly and priming.
Conclusion
This is easily one of my favorite figures - it technically took me 15 years to make it, so I guess it had better be! Like I mentioned earlier I’m probably going to redo the base a bit, but there isn’t anything on the figure itself that I would change. Also, I’ll probably NEVER put this figure for sale. Sorry!